[!ProTrack Warehouse Wiki^homepage-button_GRN_V3.png!]
Page History
...
| Info | ||
|---|---|---|
| ||
|
To access the Control Screen:
...
- Once the work order is ready (status will be in AVL, available), select and drag employee(s) from the right side of the screen into the Standard Direct section of the work order.
If needed, use the search option within the Unassigned section to narrow the list of employees to a specific group.
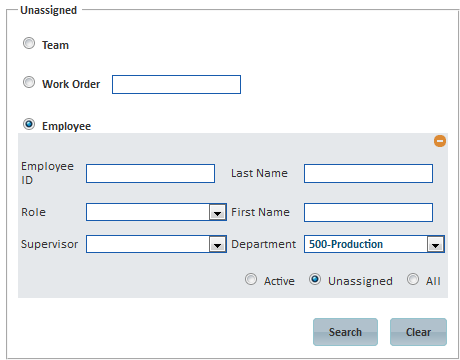
Fig.4 Control Screen - Unassigned Employee SearchField Description Team Lists all teams (grouping of employees) that have been created from the Team Config screen. Work Order Entering a work order will list all employee(s) that are working or have worked that order. Employee Enter search criteria to narrow the list of employees. - To move multiple employees at once, click the names of the individuals in the Search Results section and then drag into the standard direct section.

Fig.5 Control Screen - Selecting Multiple Employees - Once the employees have been dragged into the standard direct section, an assignment ID will be auto generated for each individual. Each assignment ID will have an appended " -#", these are considered as child assignments. The status of the work order will turn to INP (in progress).

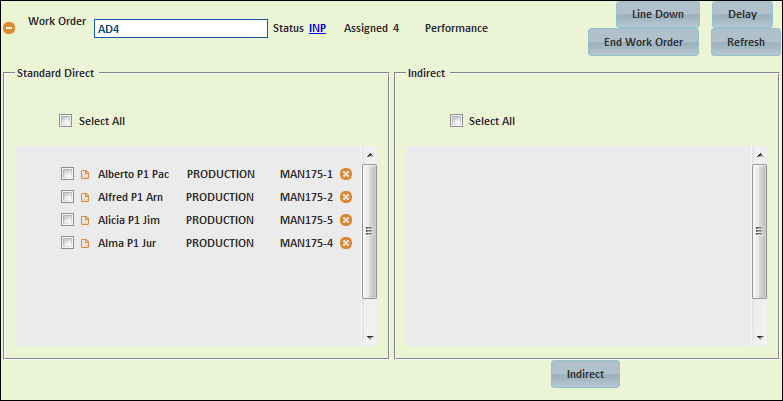
Fig.6 Control Screen - Adding Employees to Standard Direct
| Note | ||
|---|---|---|
| ||
|
Adding Employees To Indirect Activity
...
- Expand the kiosk and search for the work order.
- Select the check box to the left of the employee's names that encountered the delay or the Select All check box.
- Click
 and a popup will appear.
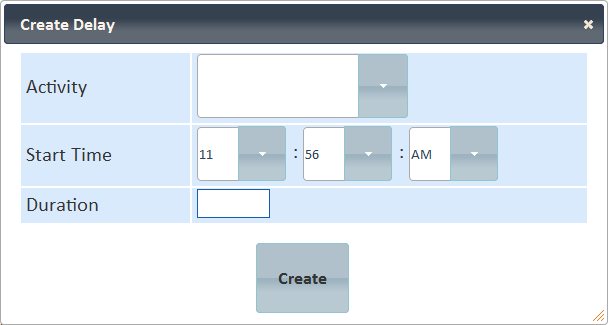
Fig.12 Control Screen - Adding Delay - Select the delay activity from the drop down list, when the delay began, and how long the delay lasted for.
Click Create and the delay will be created for each employee selected.
Info title Info - Once delay(s) have been created, they will not be displayed on the Control Screen. To view delay(s), click
 and a popup will appear displaying the employee's Daily Inquiry screen. Alternatively, delay(s) can be viewed from the Assignments Inquiry screen.
- Once delay(s) have been created, they will not be displayed on the Control Screen. To view delay(s), click
Ending Work Order or Kiosk
- Expand the kiosk and search for the work order.
- Click
 and all the assignment IDs under that work order, whether they are standard direct or indirect, will be ended with a time stamp of when the button was clicked
- .
- Alternatively, the kiosk can be ended by clicking
 . All open work order(s) will be ended with a time stamp of when the button was clicked.
Adding Line Down
- Expand the kiosk and search for the work order.
- Click
 and a popup appears.
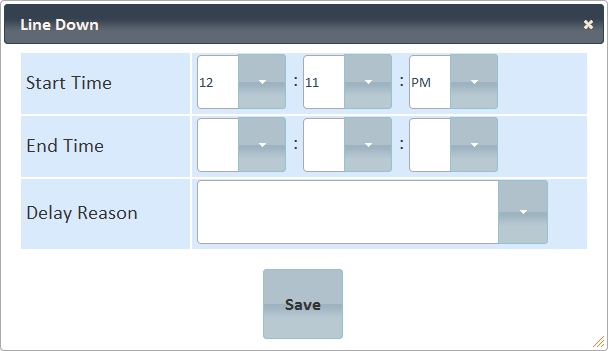
Fig.13 Control Screen - Line Down - Enter the Start and End Times of when the line down of the work order occurred.
- Select the reason of the line down from the Delay Reason drop down list.
- Click
. This will add a line down delay to the work order which can be used for reporting and tracking purposes.
- Alternatively, line downs of a work order can be entered via the Line Down Entry screen.
Ending Work Order or Kiosk
- Expand the kiosk and search for the work order.
- Click and all the assignment IDs under that work order, whether they are standard direct or indirect, will be ended with a time stamp of when the button was clicked.
- Alternatively, the kiosk can be ended by clicking . All open work order(s) will be ended with a time stamp of when the button was clicked.
Overview
Content Tools